Why NOT a VDI file?
You cannot use a regular VDI disk for this workflow. VDI is VirtualBox's proprietary container format — it is not a raw byte-for-byte disk image. You cannot mount it directly on the host, partition it with fdisk/parted, loop-mount individual partitions, write a bootloader to a specific offset, or use it with tools like dd, losetup, or kpartx. A raw .img file behaves exactly like a physical disk, which is required for all subsequent operations on the image.
Create the 30 GB raw disk image
Allocate a 30 GB raw binary file. This file will act as a physical disk — every byte maps 1:1 to a disk sector.
# Using fsutil to create a 30 GB zero-filled file
fsutil file createnew C:\VMs\disk.img 32212254720

# 32212254720 = 30 * 1024 * 1024 * 1024 bytes
mkdir C:\VMs# Create the directory and the raw image mkdir -p ~/VMs dd if=/dev/zero of=~/VMs/disk.img bs=1m count=30720 # Alternatively, use truncate (faster — sparse file) # truncate -s 30G ~/VMs/disk.img
# Create directory
mkdir -p ~/VMs

# Fast sparse allocation (recommended)
truncate -s 30G ~/VMs/disk.img

# Or full zero-fill with dd (slow but no sparse)
# dd if=/dev/zero of=~/VMs/disk.img bs=1M count=30720 status=progress
truncate creates a sparse file that doesn't immediately consume 30 GB of real disk space — blocks are allocated on write. Use dd if you need a fully pre-allocated image.
Create a VMDK wrapper for disk.img
VirtualBox needs a .vmdk descriptor file that points to the raw image. Use the VBoxManage command-line tool.
# Add VBoxManage to PATH (adjust version if needed)
$env:Path += ";C:\Program Files\Oracle\VirtualBox"

VBoxManage internalcommands createrawvmdk `
  -filename "C:\VMs\disk.vmdk" `
  -rawdisk  "C:\VMs\disk.img"
VBoxManage internalcommands createrawvmdk requires Administrator privileges and the file path to the raw image must be an absolute path.VBoxManage internalcommands createrawvmdk \ -filename "$HOME/VMs/disk.vmdk" \ -rawdisk "$HOME/VMs/disk.img"
VBoxManage is typically at /usr/local/bin/VBoxManage or inside the VirtualBox.app bundle at /Applications/VirtualBox.app/Contents/MacOS/VBoxManage.VBoxManage internalcommands createrawvmdk \ -filename "$HOME/VMs/disk.vmdk" \ -rawdisk "$HOME/VMs/disk.img" # If permission denied on the raw file: sudo chown $USER:$USER ~/VMs/disk.img
disk.vmdk is just a small text descriptor — it contains no data itself. It tells VirtualBox: "treat disk.img as the raw storage backend." You can open disk.vmdk in a text editor to inspect it.
Attach disk.vmdk to the VM as sda
Add the VMDK as the primary SATA/SCSI disk so it appears as /dev/sda inside the guest.
Option A — VirtualBox GUI
- Open VirtualBox Manager and select your VM. Click Settings.
- Go to Storage → under the Controller: SATA (or SCSI) tree, click the Add Hard Disk icon (💿).
- Choose "Add Existing Disk" and navigate to your disk.vmdk file.
- Ensure the disk is listed as Port 0 / Device 0 (this maps to
/dev/sdainside the guest). - Click OK to save.
Option B — Command line (all platforms)
# Replace "MyVM" with your actual VM name
$VM = "MyVM"
$VMDK = "C:\VMs\disk.vmdk"

# Add SATA controller if it doesn't exist yet
VBoxManage storagectl $VM `
  --name "SATA Controller" `
  --add sata `
  --controller IntelAhci

# Attach VMDK at Port 0 (= /dev/sda)
VBoxManage storageattach $VM `
  --storagectl "SATA Controller" `
  --port 0 `
  --device 0 `
  --type hdd `
  --medium $VMDK
VM="MyVM"
VMDK="$HOME/VMs/disk.vmdk"

# Add SATA controller (skip if one already exists)
VBoxManage storagectl "$VM" \
  --name "SATA Controller" \
  --add sata \
  --controller IntelAhci

# Attach as Port 0 → appears as /dev/sda in guest
VBoxManage storageattach "$VM" \
  --storagectl "SATA Controller" \
  --port 0 \
  --device 0 \
  --type hdd \
  --medium "$VMDK"
lsblk or fdisk -l — you should see a 30 GB disk at /dev/sda.
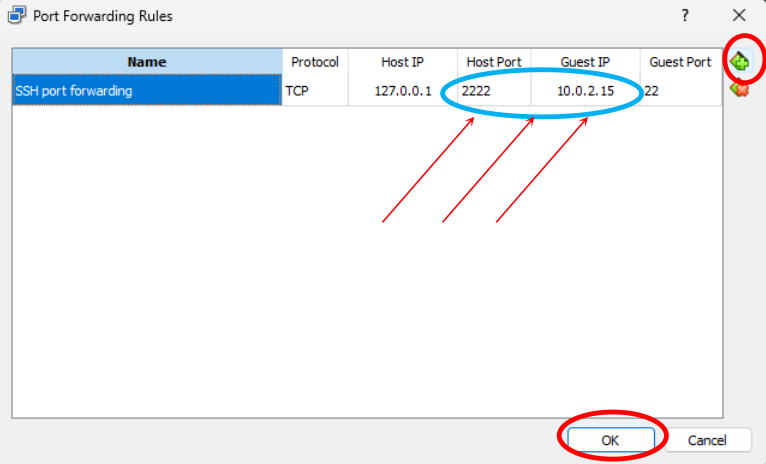
SSH Port Forwarding — host 2222 → guest 22
VirtualBox NAT networking allows port forwarding rules so you can SSH into the guest from the host.
Host (your machine)
Port 2222
Connect from here
Guest (VM)
Port 22
SSH daemon listens here
Prerequisites
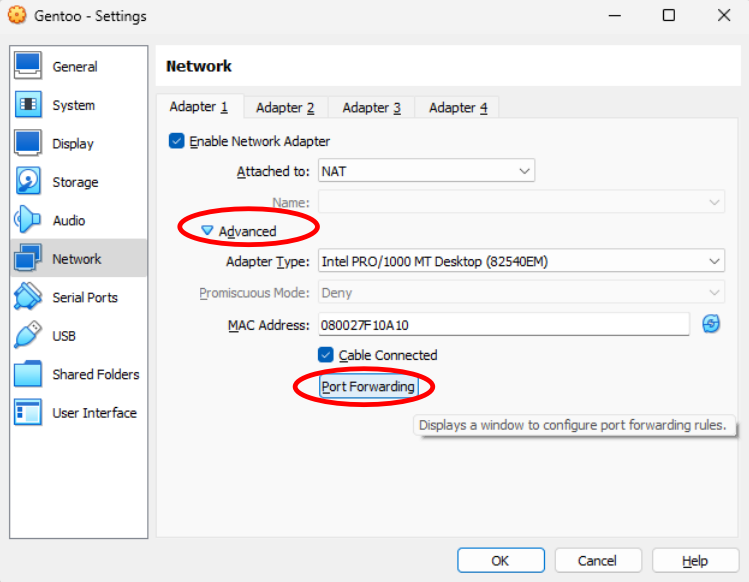
- VM network adapter must be set to NAT (default) — go to Settings → Network → Adapter 1.
- SSH server must be installed in the guest:
sudo apt install openssh-server(Debian/Ubuntu).
Option A — GUI
- VM Settings → Network → Adapter 1 → Advanced → Port Forwarding.
- Click the + button to add a new rule.
- Fill in: Name: ssh | Protocol: TCP | Host Port: 2222 | Guest Port: 22. Leave Host IP and Guest IP blank.
- Click OK twice to save.
Option B — Command line
VBoxManage modifyvm "MyVM" `
  --natpf1 "ssh,tcp,,2222,,22"

# Format: "name,protocol,hostip,hostport,guestip,guestport"
# Leaving hostip/guestip blank means 0.0.0.0 (all interfaces)
VBoxManage modifyvm "MyVM" \
  --natpf1 "ssh,tcp,,2222,,22"

# Format: "name,protocol,hostip,hostport,guestip,guestport"
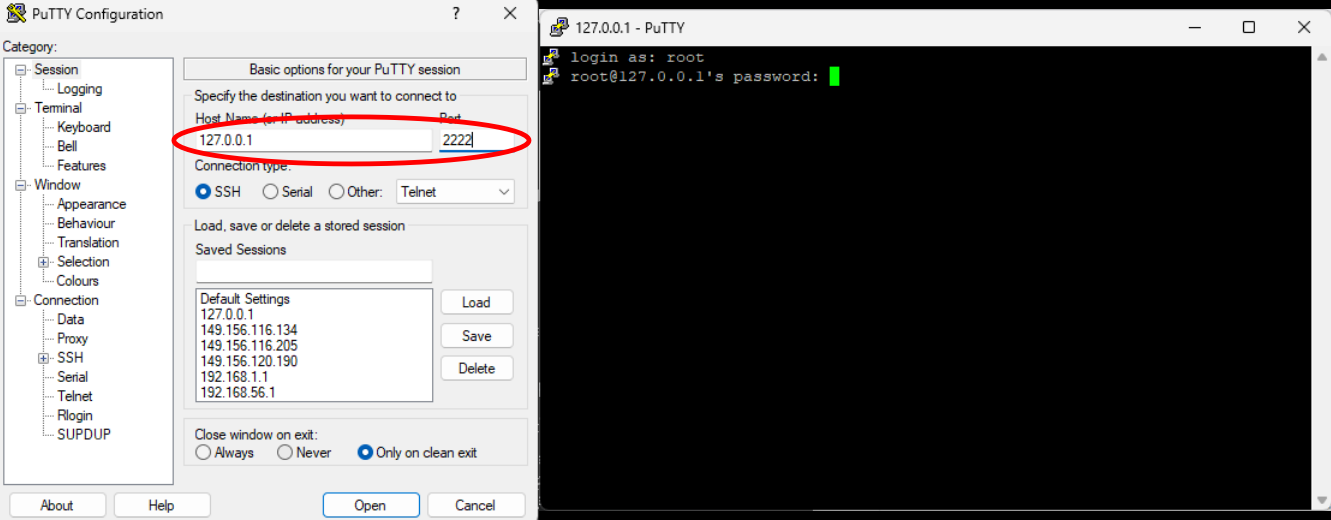
Connecting via SSH
ssh -p 2222 youruser@127.0.0.1

# Or using PuTTY: host=127.0.0.1, port=2222
ssh -p 2222 youruser@127.0.0.1
ssh -p 2222 youruser@127.0.0.1

# Or add to ~/.ssh/config for convenience:
# Host myvm
#   HostName 127.0.0.1
#   Port 2222
#   User youruser
# Then just: ssh myvm
ssh-keygen -R "[127.0.0.1]:2222".